
Updated :The drawing file is here.
It had been made long time ago, so I do not remember whether this file is final version or not.
----------------------------------------------------------------------------------
Hi, all.
It had been made long time ago, so I do not remember whether this file is final version or not.
----------------------------------------------------------------------------------
Hi, all.
I like to start google blogger to share my DIY stuffs.
There are many results of my DIYs in my Korean blog (blog.naver.com/bumhee34), but the articles are all written in Korean.
Anyway, I would like to share the recent result of my DIY.
I have made 2k beam project of which resolution is 2560x1440 :)
As far as i know, very high resolution commercial beam projectors (more than 2k, DLP-type) are way toooooooo expensive.
BUT! This DIY 2k projector (LCD-type) costs less than 1000 USD.
The original post is in my naver blog : http://blog.naver.com/bumhee34/220381674658
Let me start !
Actually, this is my 4th DIY beam projector.
1st one is FHD beam projector with water cooling, but had lots of issues.
So, I've made 2nd beam projector based on 1st one, and it is the same with 1st one except the cooling method.
This one has been used in my room with 120 inch screen :)
The third one "was" 2k beam projector, but it has lots of issues. In addition, the LCD was broken during experiments to fix the issues ㅠ.ㅠ
After around one month, I had decided to re-make the 2k beam projector.
The specifications of 4th DIY beam projector are
- LCD & LCD hdmi board : 5.98", 2560 x 1440 resolution from http://www.topfoison.com, I used the hdmi board from my 3rd baby, and reordered only the LCD (around 200 USD)
- Case : black arcryl with lazer cut, and one side is sanded in advance ( I hate to use spray ! )
- Air circulation : This is the most important part. If the air is not circulated well, your LCD will be dead with black spots. I will install small blower fans to cool down the air near the LCD.
- Lens : use F120/F185 fresnel lens, F190 (or F200 is ok) projection lens, and square(?) condenser lens to increase brightness
- LCD holder : this LCD has very small inactive area (less than 1mm each side)... But I could measure dimensions exactly from the dead LCD, so could make a holder made by arcryl. I will explain the method to hold the LCD later.
- LED light : 150W with heatpipe (there are many products in aliexpress or taobao)
- ETC : No soldering (cause my soldering tip is broken)
Since the post is rather long, I upload the final shots first.
The side view moves my heart.. hehe

As you can see, there are AC socket, lock switches, fan controller, and digital thermometer to watch LED temperature.

This is the front view. Looks like a turtle..

On the other side, there is a big hole for a blower fan to feed fresh air inside the case.
There is a hdmi port, and the hdmi board doesnot have any useful features like flip/invert rotate...
So the signal must be sourced from a PC. You cannot use a blueray or DVD player.

The backside has two fans, and dust filters are attached.

Let me start the build log.
I start from the LCD holder.
You should be very careful to make the holder, or you will end up with many light leakage.
First of all, I ordered arcryl parts based on the exact measurment from the dead LCD.
I always buy arcryls from "hanaarcryl" : http://hanaacryl.com
Since the arcryl is cut by lazer, the resolution is not perfect. (0.x mm)
If you want a perfect cut, you must use CNC.
Luckly, the resolution was ok for my usage.

The below figure shows how the LCD is held.
Two parts are combined by nuts and bolts, then the red area can support the inactive area of the LCD.
Thanks to my dead LCD :)


Let me check whether it works as I intend.
It is perfect!! Yeah!
After checking, strong double-sided tape was used to hold LCD temporarlly.
I like to use the "TESA" double-sided tape bought from http://sytape.co.kr/goods/view.php?seq=391

After then, the above part is removed, and combined with another part.That part covers inactive areas, and play a role to hold LCD.
The LED light can penetrate the red active area only, so there would be no light leakage.


This is the light leakage example from the 3rd DIY beam projector (dead one)

Nust and bolts are tightend to hold LCD permanantly.

This is the front view in which the LED light comes.
A protective film was attached to prevent dirts until other parts are complete.

A big burden is gone.
Let's order other parts after AutoCAD drawing.
This figure shows other parts.
All arctryl parts were cut by lazer.

And electric wiring will be done with the help of connecting parts (?).
I do not know the terminology, but anyhow I bought them cause it was cheap :)

But!!!! In my drawing, there were mistakes!!!!!
So I could not assemble them ㅠㅠㅠㅠㅠ What a stupid man.....
Sayonara...

Anyway, I'd reordered them after I had corrected the drawings.
This picture shows the holder for the fresnel lens and the LCD.
On the right hand side, there are parts to install small blower fans to cool down hot air near the LCD.
The arcryl parts are glued with "chloroform".

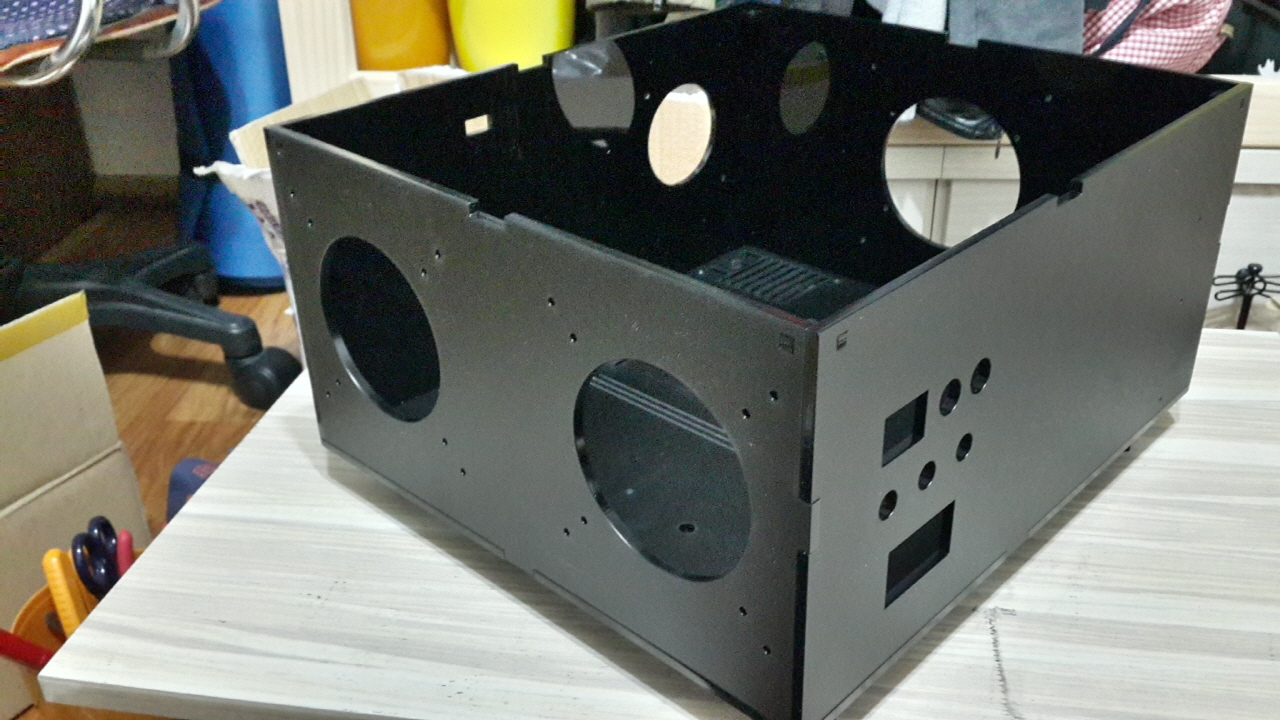
This is the bottom of the case.

The sides of case are combined together temporally by the below parts, and choloroform is used to glue them permanantly.
And there is 3 Pi screw hole to hold the top cover.

So, they are combined like this...

Then, combined with the bottom.

The shape looks like this.
Choloroform is injected on the edges of the case.
It will look like this if you enclose it by the top cover.

Fresnel lens are held by some arcryl parts like the LCD holder.
If you look at the cut-side of arcyl by lazer, it is rather reflective (shinny).
This will lead to light reflection, and it will result in poor image quality.
So, you should sand those sides.

But! I do not want to sand something anymore.
So, I bought a micro sanded paper(?). Cut the paper,

Then, just stick it on the shinny side.

If I compared the shinny side to the sanded paper, it looks like this.

After then, the fresnel lens are held by these parts.
I forgot to take a picture..

Now, wiring time comes.
The fan controller comes from taobao.com in very cheap price, but it is quite strange...
The red line should be + line, but it it not...
And there is no rule, some red line is +, some is not. :(
And there is no rule, some red line is +, some is not. :(
I should check one by one. Anyway it works.. amazing China. haha
Anyway, the AC socket, digital thermometer, fan controller, and lock switches are placed.

And...
?? I do not know why I took this picture??

Two 90 mm by 90 mm fans are attached on the back side.
The air comes in from one fan and goes out through another fan.
So, the basic idea of air flow is that the fresh air comes in, LCD is cooled down, and the air cools down the heat pipe for LED.
One blower fan is also used to pull in fresh air.

Ah! To attach the LCD hdmi board, I need 2 PI screw holes.
And I should make the holes by myself using hand tap (?).
Usually, we have one at home :)
Usually, we have one at home :)

Install a dust filter to prevent from dirts.

like this


And one more!

As I have an experience to kill the LCD from the 3rd beam projector, I am crazy to cool down the LCD.
This might be an exaggeration.
Four small blower fans are installed in the right hand side, and three small fans are installed in the left hand side.
Four small blower fans are installed in the right hand side, and three small fans are installed in the left hand side.
And the LCD will be placed in the position as shown in the picture.

So, the air comes in via the blower fans,

and comes out through the small fans on the other side.
Maybe too much? but better not to burn the LCD.

The dizzy wirings are rearranged by shirink tubes (?, 수축튜브).
I do not have a heat gun, so I used a dryer.
It is quite interesting that the tube is shirinking by heat!

And the connectors are combined with wires by a sqeezer (?압착기).

This is a parallel connection of USB power and LED driver power lines.


It is too difficult to make it neat.

The LCD hdmi board are fed by USB power, and the signal comes by hdmi port.

I had not considered the USB power supply volume...
It is rather big, and I just attached it by a 3M double-sided tape.
Next time, better to buy small sized USB PS.

I tried to make wiring neat ! but, dizzy!

Before installing fresnel lens and LCD, I had tested the LED and fans.The controller works well, and the LED is turned on.
One of fans is somehow broken, so it make strange sound during the test... It is not breaking wind :(
Now, almost done.
It is too shinny inside of the top cover.
So, I stick the micro-sanded black paper on the side.
This part is not seen, so you can stick the paper ugly.
And there are air holes, and dirts can come in through those holes.
So, let's install dirt filter.

I found a useful tool during web surfing.
This is a bug filter (? please let me know a proper term). And it is very cheap.

The bug filter is combined with the following dirt filter.

Tada! Nice dust filter is completed.

Tada! Nice dust filter is completed.

The outer part looks like this.

It looks like a commercial dust filter, right?

Now, the LCD and the fresnel lens are installed.
As you can see, I've used F120/F185 combination, and it works well with 5.98" LCD.

Almost done!

You can see the parts I used.
Ah! You might be wanna know the spacing between lens.
- LED light to back fresnel lens is around 120 mm
- Back fresnel lens to LCD is around 20 mm
- LCD to front fresnel lens is around 20 mm
- Front fresnel lens to projection lens is around 210 mm
Rule of thumb, there is no reference guide on spacing, since the optics is not perfect.
You should adjust it manually.

After covering the top cover, DONE!
Beautiful front view..!

My photo is not beautiful, but it is beautiful in reality.
Neat back side :)
And crazy dizzy room.


Let's test !
Check the resolution first.
Yeah it is 2k, yes it is 2k.
I have plan on a 4k projector also. (Maybe soon!)

Let me check the focus.
The focus is good in all area. (Be careful! It is good enough, but not perfect. Cannot see every pixels at the same time.)
Due to my room size, the image size is around 100 inch out of 120 inch screen.

I took several pictures.
20 th century bla bla..

A horse with wings...

And the famous goddess from sony company....
It is 2k, but my photo is 720p :p


I do not have 2k source.
But youtube has :)

It was amazing that youtube has lots of 2k sources.

I took two videos of 2k trailers.
Due to limitation of my cell phone, the quality may look poor.
But it is really damn good!!
This is the hobit 3 trailer.
And avengers 2(3?) trailer.

If you can access to China market (aliexpress or taobao), the total price would be around 600 USD.
And it is way too cheap compared to commercial 2k or 4k projectors.
Of course they are using DLP technology which is much better than old technology used in DIY projectors.
Anyway, if u r interested in this, you can make it!
See you! I will bring other DIY stuffs later!